 Copy To Clipboard ( Modeling )
Tool summary :
- Copies members that you can paste to other locations within your 3D model or to 3D models in other SDS2 Jobs.
- See (on this page):
Also see :
- Modeling (program in which Copy To Clipboard is a tool)
- Paste From Clipboard (a related tool).
page 1 | contents | model > member > | paste from clipboard (related)
A video and an example :
|
| Disclaimer: The reference point used in this example is located on a member that is not one of the members that are copied. For situations where rotation is required, it is best to locate the reference point on one of the copied members. |
|
page 1 | contents | model > member > | paste from clipboard (related) | top
Ways to invoke Copy To Clipboard :
In Modeling :
Method 1: With members selected in the model, right-click and select " Copy To Clipboard " on the context menu .
Method 2 : Click the icon. The icon can be taken from the group named ' Model -- Member ' and placed on a toolbar (classic) or the ribbon (lightning).
Method 3 : If " Modeling layout style " is ' Classic ', you can use the menu system to choose Model > Member > Copy To Clipboard
Method 4, 5 or 6 : Copy To Clipboard can also be configured to be invoked using a keyboard shortcut , the context menu , or a mode . For the lightning interface, this configuration is done using Customize Interface .
Note: You need to preselect members before using the context menu. Other methods can be executed without preselecting members, regardless of the selection filter . The step-by-step instructions use the context menu.
page 1 | contents | model > member > | paste from clipboard (related) | top
General information and cautions :
page 1 | contents | model > member > | paste from clipboard (related) | top
Step-by-step instructions for copy & paste :
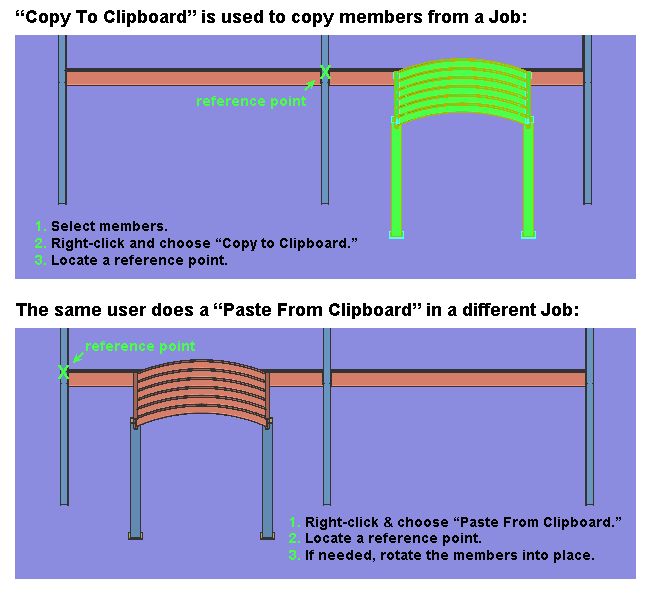
These instructions tell you to use Copy To Clipboard and Paste From Clipboard to copy members from one Job into another. Method 1 (the context menu) is used to invoke Copy To Clipboard . These instructions would be a bit different if a different method of invocation were used. Please be aware that you, the same user, should perform all of these steps -- see General information and cautions .
1 . Before invoking Copy To Clipboard using the context menu , select the members that you want to copy. Select Items bindings need to be active in order for you to be able to select members. Also, the selection filter must be ' Default ' or ' Legacy Default ' or ' Members ' or to some other filter that allows the selection of members..
|
|
|
Select Items bindings |
Selection can be done using Select (
) or Select + (
2 . Right-click and select " Copy To Clipboard " on the context menu .
3 . Locate- Pan -Return mouse bindings become active along with various Locate options (snaps). The status line prompts, "Locate a reference point:"
|
|
|
bindings |
Alternative 1 : Select the Locate icon (snap) that you want (if its not pressed already), then place your mouse pointer (
) so that the point location target (
) snaps to where you want the reference point, then left-click ( Locate ). Go to step 4.
Alternative 2 : Pight-click ( Return ) to end the Copy To Clipboard operation and keep everything as it was before step 1. Do not continue.
4 . The members that you selected in step 1 are automatically deselected, and those members are now copied to the clipboard. See General information and cautions .
4a : Home > " Change Active Job " to a different Job. This will be the Job to which you will Paste From Clipboard the members that you copied.
5 . In Modeling in the Job you opened in step 4, you should be in a view that provides a suitable point for reference point location. If needed, you may want to Construction Line Add to create such a suitable point.
5a : Invoke Paste From Clipboard using any one of the available methods.
6 . Locate - Pan - Return mouse bindings become active along with various Locate options. The status line prompts, "Locate a reference point:"
|
|
|
bindings |
Alternative 1 : Select the Locate icon you want (if its not pressed already), then place your mouse pointer (
Alternative 2 : Pight-click ( Return ) to end the Paste From Clipboard operation and keep everything as it was before step 5. Do not continue.
7 . The Rotate Material window opens. Note that the " Coordinate system " is set to ' Global ' and cannot be changed. Also note that the global axes that you can rotate the pasted members around originate at the reference point you located in step 6. Those members are the same distance and relative position from that reference point as were the members that were selected in step 1 were from the reference point that was located in step 3.
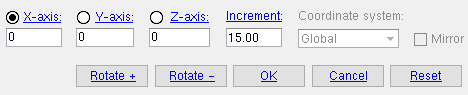
Alternative 1 : To accept the position of the members as they are currently shown on screen, press " OK " without first rotating the members. Go to step 8.
Alternative 2 : Select the axis (
" X " or
Alternative 3 : Press the " Cance l " button to end the Paste From Clipboard operation and keep everything as it was before step 5. Do not continue.
8 . The new members you copied from another Job (steps 1, 2 & 3) are now a part of your current Job , which you changed to in step 4. The members can be operated on using the same tools that you can use for any other members. For example, if you need to adjust their location, you can use Model > Member > Move/Stretch .
page 1 | contents | model > member > | paste from clipboard (related) | top